Start a restaurant website with the tasks a customer needs to finish: read the menu, check prices and hours, find the location, and reach the correct ordering or reservation service. This walkthrough uses WordPress’s block editor to build the menu and contact layer, with an explicit handoff to a separate ordering provider.
Worked example: Canal Table is a fictional lunch restaurant. The sample menu, prices, and hours are invented for this tutorial. We rendered its native blocks using WordPress 7.1 and tested desktop and mobile layouts. The example is not a client case study, and it does not accept orders or payments.
1. Decide What Your First Release Will Handle
For the example, the website displays a lunch menu and pickup information. An ordering provider would handle item selection, payment, and order confirmation. That boundary matters: adding an Order button to WordPress does not create a checkout, reserve inventory, or tell the kitchen that an order exists.
You need a working WordPress installation, permission to edit pages, a mobile-friendly theme, and approved menu and business information. The sample uses native blocks without a paid menu plugin. Domain, hosting, maintenance, and any ordering-provider subscription or transaction fees remain separate. This guide starts after WordPress is installed; it does not cover server setup.
Collect the menu names, descriptions, prices, options, availability, normal hours, holiday exceptions, address, phone number, and correct provider URL before building. Assign a staff member to approve these details. Use your own food photographs or properly licensed images; do not imply that a stock photograph shows a dish you actually serve.
2. Create a Menu Page You Can Edit
In WordPress, open Pages > Add New and title the page Menu. Start with a short introduction, then add headings for the menu categories. Under each category, add an item heading and a paragraph containing its description, price, and any relevant options. Keep the menu as text rather than requiring customers to open a PDF or read prices from an image.
To start from our example, open the downloadable WordPress menu blocks. On a new blank draft page, use the editor’s three-dot options menu to switch to Code editor, insert the file’s contents, and return to the visual editor. Do not replace the content of an existing live page. The WordPress editor guide explains those editing modes.
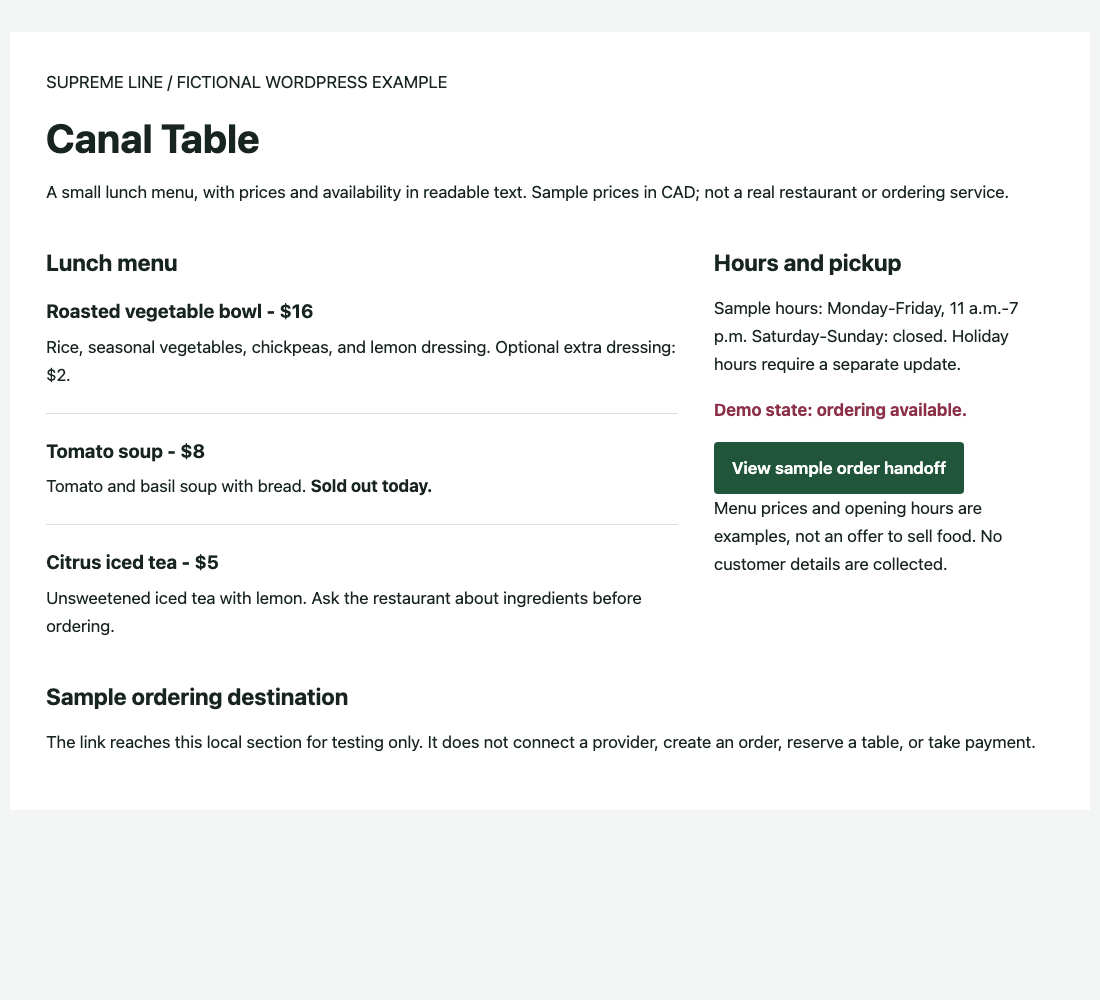
The file contains a fictional name, three menu items, a hours column, and a demonstration link. It contains no scripts or payment connection. Your theme controls its final appearance; the screenshots below use simple preview styling, not a packaged restaurant theme.
3. Make Each Menu Item Unambiguous
Our example uses a roasted vegetable bowl at $16 CAD, an optional extra dressing at $2, tomato soup at $8, and iced tea at $5. Those numbers demonstrate where information belongs; they are not restaurant pricing advice.
- Name and description: Say what the customer receives, including the portion or size where it affects the order.
- Price and options: Keep the base price separate from add-ons. Explain applicable charges accurately and ensure the provider’s checkout matches the approved offer.
- Availability: The soup is labeled Sold out today in ordinary text. Do not communicate availability through color alone.
- Ingredients and dietary questions: Publish only information approved by the restaurant. Do not infer an allergen-free claim from a recipe name or photograph.
To update an item, select its heading or paragraph in the visual editor, change the relevant text, preview the page, and save. A Group block can keep related content together. A manual WordPress menu does not synchronize availability with an ordering system: the staff owner must update both unless a separate integration handles that job.
4. Connect the Correct Ordering Destination
Add a Buttons block with a clear label such as Order Pickup. Set its link to the restaurant’s verified ordering page for the correct location. Check the destination on a phone, not just in the editor. If ordering happens on another service, make that handoff clear before the customer leaves your site.
The example’s button intentionally points to #order-preview, a section on the same page explaining the simulation. Replace that destination before any real launch. Do not leave the sample link in place under a real Order label, and do not treat a successful link click as proof that checkout works.
For a reservation-only restaurant, use the verified reservation link instead. Publish a response-time statement only if staff can meet it, and distinguish a reservation request from a confirmed table. Provider-specific setup depends on that service and the restaurant’s account; this walkthrough does not configure one.
5. Publish Hours and a Useful Fallback
Put the real address, contact number, opening hours, pickup hours, and holiday exceptions where customers can find them without starting an order. Test a directions link against the actual location. A clickable phone link should use the approved business number, not a sample number from a template.
Decide what happens when the restaurant is closed or the ordering service fails. If the provider accepts advance orders, explain that and link to the relevant booking window. Otherwise, remove the order action and show the next available service time or verified contact route. Do not leave an apparently active ordering promise with nowhere useful to go.
In our closed and unavailable test versions, we manually changed the status message and removed the demonstration button. The sample does not calculate opening hours or detect outages automatically. Automatic scheduling or provider monitoring requires additional implementation.
6. Check Mobile Reading and Keyboard Access
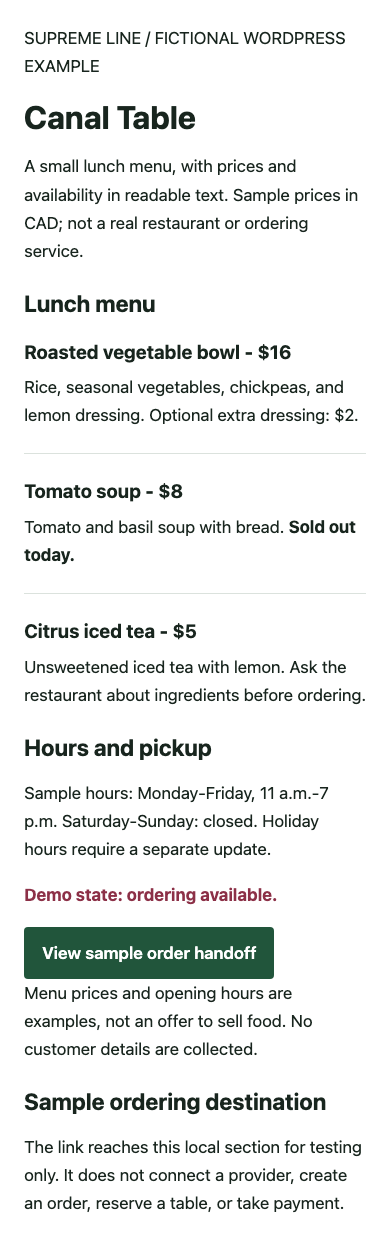
Preview the page at a narrow phone width. Category headings, item descriptions, prices, and buttons should remain readable without horizontal page scrolling. If a multi-column layout becomes cramped, stack the menu above the hours. Check an actual phone as well as the editor preview.
Use the Tab key to reach the ordering link and Enter to activate it. Keep a visible keyboard focus indicator. After changing an item’s price or availability, clear any relevant page cache and verify the public page, not only the editing screen.
7. Separate What We Tested From Your Launch Checks
Our example test, September 13, 2026: Native blocks were rendered with WordPress 7.1 and checked in Chromium at 1100- and 390-pixel widths. All six combinations of width and manually selected open, closed, or unavailable state passed the checks below.
| Example check | Observed result |
|---|---|
| Menu and sold-out status | Readable text in both viewport sizes |
| Horizontal page overflow | None at either tested width |
| Open-state handoff | Tab and Enter reached the local sample destination |
| Closed and unavailable states | Status text present; sample order button absent |
| Customer data and payments | No form, order submission, reservation, or payment connection in the sample |
These checks did not test WordPress editor interaction, a third-party provider, checkout, kitchen notifications, automatic stock updates, or a live payment. Before launching your restaurant site, use the provider’s approved test facilities to verify item options, taxes and fees, pickup times, confirmation delivery, and cancellation handling. Do not place a real charge or reserve a real table merely to test an unfinished setup.
8. Assign the Daily Update Responsibilities
Before publication, remove every fictional detail and sample destination. Have the restaurant owner approve the menu and business information. Add the finished menu to the site’s navigation, then check the published page and the ordering handoff again.
Agree who updates sold-out items, prices, holiday hours, and provider links, and who takes over when that person is unavailable. Keep one approved menu record so the website, printed material, and ordering provider do not drift apart. A simpler website that stays accurate is more useful than a larger one that staff cannot maintain.
Need Help Connecting the Website and Ordering Service?
Our website design and development team can scope the menu, mobile layout, provider handoff, and ongoing responsibilities. Tell us which ordering or reservation service you already use and what customers cannot do reliably today.